February 13, 2013
So, after a few months of research and combing the web, I took the plunge and ordered a Factory Five 33 Hot Rod Stage 1 kit. Pick up from FFR is scheduled for March 9, why do I feel like a kid waiting for Christmas. In the mean time, I have been scouring the forums looking for tricks, tips and the like to make mine a little different from the herd, although there are several posted that I love, including Eric H.'s and Henry R.'s. This blog is my thoughts and trials, and will become my build guide once it really gets started.

My plan is:
Old school style rod, satin black, no fenders, roof, hood or hood side panels. All suspension parts will be black. Have not decided on grill and windshield frame yet, they may stay aluminum to match the firewall and some engine parts. No chrome if I can avoid it. Maybe some bits of blue here and there, distributor hold down, HEI cap, and Taylor wires. All braided stainless hoses, black and silver. Motor will be a SBC, 383 stroker with 700R4 trans and 96 Ford Cobra 8.8 rear, with 3.29 gears.

Wheels are the typical American Racing Torq-Thrust M, in gray, from Summit. 17x8 front, and 18x10 rear.

Made my first mistake of the build in selecting tires. I shot from the hip a little and ended up with tires that were low and wide on the back, and 3 inches taller on the front. Unfortunately, I chose a brand that did not have either one or the other that I could send back and fix my dilemma, so all 4 went back...at a cost of $100. If you are choosing tires, highly suggest this website, they have a tire height calculator:
Ended up getting a set from Tirerack.com. (2) 285/35ZR18 Sumitomo HTR Z II and (2) 235/40ZR17 Sumitomo HTR Z II. $546.00 delivered. Omni-directional and have a neat aggressive pattern on them. Currently on my screened in back porch and the cat is using them for a training area for hole crawls.

Sourced the tranny locally, needs a different paint color. Motor is coming from Skip White Performance in Tennessee. Rear was an eBay find from MPS Auto Salvage in Atlanta. They sell nicely redone rears for good prices. Because this one came with new Cobra brakes, I did not need the FFR ones. I am thinking drilled and slotted rotors for aesthetics all the way around.

Now, while I wait patiently for March to come, I have begun setting up my garage for the fun.
My garage is on the small side, a 1 1/2 car built in 1952. Heat was not needed, so I rely on a few space heaters to get me through the Ohio winters. I did have the garage re-wired a few years ago to a 60 Amp circuit with 2-220 breakers and 4-110 ones. This gives me plenty of power for my 220v Wire Feed Welder and 60 Gal compressor. Also have an older model large floor standing drill press, 12 ton shop press, bench grinder on stand, a 41"x 65" stainless tool box, and a smaller Craftsman box with even more tools.
I have a full array of air tools including a riveter and body saw. Saw under some of the posts that these come in handy. I did purchase a couple of new sanders to help with fab and body work. Also bought the following to help with the project:
- (2) sets of taller jack stands with poly pads
- a set of AN wrenches
- assorted tubing benders
- heat shrink tubing
- variety of wiring connectors and ends (shrink capable)
- penlight butane torch
- magnetic angle measurement tool (for pinion angle and roll bar fab)
- bench top rack for nuts/bolts
- new regulator and filter for my compressor lines (my old one was a POS Kobalt and leaked)
- a small Harbor Freight compressor when I just need to air up a tire or two
- cable cutter (for cutting braided lines)
- Koul Tools braided line tools
- new HVLP paint guns
- new solder gun
- cool magnetic paper towel holder for Shop Towels
- pneumatic brake bleeder
Started buying parts like mad too. Made a list and checked it not enough. I am keeping a spreadsheet of EVERY part, from whom and the cost I buy with a running total. This will give me an accurate estimate for insurance purposes.
My list for the engine and tranny includes:
- Long block engine with single plane hi-rise intake, harmonic balancer and flexplate
- 700R4 transmission
- 2500 stall Torque converter
- Proform 750 DP/MS/EC Carb with Double Barrel Air Cleaner
- HEI distributor and hold down
- Ignition box
- Spark plug wires, separators, and plugs
- Fuel pump, carb inlet lines, filter, and lines from frame
- Throttle cable, return and transmission kickdown brackets.
- Water pump, pulleys and belt (Gilmer blower style belt drive!), and anodized block plugs for intake and water pump
- Crankcase ventilation - fitting to the valve cover and vented to the intake, all stainless/black
- Alternator
- Assorted nuts and bolts for the above parts
February 19, 2013
Wife sent me this picture from outside my front door:
Looks like Summit and Harbor Freight are moving in, wheels, tires, jack stands and God know what else! And I am on the road and cannot even open my presents!
February 21, 2013
More gifts arrived today, killing me I am not home. This weekend will be fun with getting tires and wheels mounted, unpacking and preparing the garage some more. Going to have to use my screened in back porch as overflow storage. Wonder what my neighbors are thinking...Ordered the springs for the front and rear shocks, and my headers
I do not like the red shocks so I will be painting them blue I think since the new springs are silver. Going to use the DuPont silver base with anodized blue for the topcoat.
February 23-24, 2013
Spent most of the weekend inventorying the parts I have purchased while I am waiting on the chassis. Bought a locally rebuilt 700R4, and put a B&M shift kit in it today. Found a few missing items, mostly -AN fittings that I overlooked for the fuel, vacuum and PVC lines. Found a neat item at Jegs that allows me to hook up an AN line directly to a port on a valve cover, since I am not using a PCV valve. Jegs Vented AN Breather Fitting:


Got all Earls/Summit fittings for them and -4 S/S hose, so I will not be using any of the plastic and rubber stuff CNC sends with them. Did realize that I cannot put the fittings on both ends BEFORE I thread them through the firewall...so that may be a challenge putting the other end on without my bench vise.
Also ordered my Power Stop Brakes for the 33. Since I have Cobra's on the rear, they are slightly larger than the front (11.65 vs 11). I plan on painting the centers of the rotors black. Bought Eastwood's caliper/rotor paints for that. The calipers and mounts are getting painted black as well.
As it stands right now, subject to change, the radiator shell will be satin black with aluminum fins. Firewall will be left aluminum and scuffed with vf 3M pads. 10-32 x 3/4 Stainless screws will secure the firewall. Front control arms and radiator supports will all be gloss black along with the FFR frame.
February 27-28, 2013
Got the motor on order, it is being built in Tennessee. Thought I would take a day trip down to pick it up and save on the $350 shipping cost. With gas and lunch, it was going to cost me about $200, so I would have saved $150. They told me on the day of sale that if I picked it up, I would have to play TN sales tax at 9.5%. So no more savings, and would have cost me money to go get it. So, it is being shipped, due out of their shop in 2 weeks, should be to me around the time my HR gets here.In the mean time, ordered some more braided lines and AN fittings, and the carb. Power Stop rotors and pads came in as well. Will be getting them painted this weekend. Also, ground off a logo from my rear end cover using a belt sander and 30 grit belt. Took it off like it was never there and left a nice machined aluminum look to the center of the overall black cover. Rear end is due in tomorrow. Will pick up on Friday. Also installed the 3 Qt oil pan on the tranny. No logo, but is a TCI piece. Got a good eBay deal on it, but paid $30 for shipping which I thought was high.
Saw in another build, a guy using race car start/stop/and ignition switch panels. Non-traditional but I like them too. I am considering a Pro-ratchet shifter on the inside, maybe I will go race car inside as opposed to rod or bomber style. Hmmmm....more food for thought. Already decided on these seats:

Think I am going with the Auto Meter Lite white faced gauges and a push button starter/ignition panel to compliment the race car look. Like the ones from Joes Racing, but not the logos. Found a couple on eBay that have potential. I must show restraint, I don't even have the frame yet, and am already thinking about the interior.
Brake pad and rotors from Power Stop (Summit Racing) showed up yesterday. Going to paint the centers tomorrow. Will post pics once done. Need to get me some sort of drying rack to hang them one.
Also, rear end is in from MPS Auto Salvage in Atlanta. Pick it up from the shipper tomorrow. Love the price, did not like the time it took them to ship it to me, almost 3 weeks. The motor I ordered stated it would be 2 weeks before it was completed. MPS stated nothing like that. Guess I am just venting, am spoiled by 2-3 day shippers. They also did not include the e-brake cables and brackets.
March 3, 2013
Made a redneck drier rack out of PVC pipe and chain and hung it from a rafter. Two infrared heat lamps, one on either end should speed the drying time a little. The Eastwood caliper paints are awesome and dry hard and fast.Got the calipers and rotor centers painted and put on the rear.
.JPG)
.JPG)
Made a couple of cheesy little dollies to move the rear end around on until I get it installed. Works great!
March 5, 201
Motor on my compressor went out. Found a new one at Harbor Freight...love that store. Had to do some plumbing, forgot how much I hated trying to bend larger copper tubing. Much quieter now though.
Car is supposed to be picked up by Stewart on Monday maybe. Cannot wait!
Since my garage is very old, and having a nice floor in it is not practical, I am borrowing an idea from Kai and putting down some indoor/outdoor carpet underneath it to help save on my knees and back while working on the beast.
March 10, 2013
Do not know when she will be picked up yes, was supposedly ready on the 9th. As I read more and more builds, I am overwhelmed by the talents and fabrication skills of many out there. I however, am not one of them. My build will be pretty much by the book, and I plan to document all of it to help people without fab skills, but can turn a wrench, use a drill, and spray with a rattle can. Like I mentioned, it will be an old school rod with a race car interior. No creature comforts at this time. A radio "may" be added later. Was thinking white racing stripes...not that common on these cars, but might help with the a little different I am looking for.
Will probably put my ATV up for sale in the next couple of months to make room for the body. Anybody need a beautiful 06 Polaris 800 EFI Deluxe?
March 12, 2013
Just heard from Jolene at Stewart, I will be loaded tomorrow and am the 5th delivery on the truck.!!!!
Bought a really nice Duralast 2 ton foldable hoist and motor leveler, brand new, for $150 tonight. Now I can put the heart in the beast.
March 13, 2013
Heard from the trucker bringing in my chassis. Depending on whether Ford in Detroit will accept a Saturday delivery, he will be here either Sunday or Tuesday. Hope it's Sunday!!!!
March 14, 2013
Bought a couple more tools, a Porter-Cable bench belt/disc sander combo with stand and am trading some woodworking tools and table saw blades for a Porter-Cable bandsaw. It has two speeds and can cut tubing and aluminum with a metal blade, so I bought one of those too (blade). Spoke with Joe, my driver from Stewart, still don't know when he will deliver...looking like late Monday or early Tuesday....crap! Thought I would post a little eye candy, although this picture does not do it justice...
.JPG)
March 15, 2013
OK, it will be late Monday for my delivery. Argh...
Like I mentioned earlier, my garage is on the small side, but I have it all cleaned and ready for the chassis.
.JPG)
March 18. 2013
Woo Hoo...HR #530 arrived. Joe from Stewart was a blast. He had just picked up a Mark III from Ford, and it was in the way, but his crane made a short order of it. That and 20 boxes later, she was sitting in my garage. I started the inventory, and got all the parts out for the powder coater. Have to hit the road tomorrow for a week, hope to finish the inventory this weekend and maybe start the assembly..JPG)
Big truck in a small small-town neighborhood. Gotta wonder what my neighbors, who average in the 70's are thinking!
.JPG)
Tried to talk Joe into leaving the Cobra with me he had in the back, but no go...
.JPG)
The 20 boxes stacked up next too my garage for inventory. Have to keep them on my back porch as I do not have the room in the garage. Some of them were pretty freakin' heavy. Can say one thing for FFR, they pack them extremely well, you should see the pile of brown paper packing I have in the corner.
.JPG)
Thanks to a cart and a buddy, we wheeled the chassis into my garage and got her on the jack stands. She is VERY light, considering. Interior is definitely on the small side, time to lose some weight.
March 21, 2013
Just heard from the engine builder, my motor is alive:
March 22, 2013
Off to the powder coaters tomorrow with a slew of parts, and to pickup my finned valve covers and finned double barrel scoop that I had plated black wrinkle. He had some issues with masking off the fins, so I am going to try a gentle belt sanding on them to highlight them as I wanted to keep them aluminum. He is a small time coater, does a great job, and was VERY reasonable compared to the bigger guys. He showed me some parts he was doing for a rat style bike, the coating is called "rust" and was really bad ass. If I was not spending a small fortune on my 33, a rat style would have been very cool. $100 for the valve covers and the huge scoop. He even coated the scoop inside so when open it will show black as well, the butterflies too!
March 29, 2013
Picked up the front end parts from the powder coater. $180 for all the front end parts, and motor mount plates...thought it was very reasonable. Dropped off the radiator mounts that I forgot the last trip.
March 31, 2013
Got the inventory completed yesterday with the help of my step-son. No items missing. Started the assembly. Front end control arms are done, as are the rears bolted to the housing. Realized I had some parts on the rear end that are bare steel (not FFR) and need to do some dis-assembly to paint them. Got the shocks painted blue, and hit my first struggle. Could not for the life of me figure out how to put the cap on the shocks to hold the spring in place. Laying in bed, and it hit me...went back out to the garage and it worked. Strange....I do think the instructions could have been a little more clearer. You have to slip them on over the shaft, then down and secure with the snap ring.
Also realized that according to the guide, I have to move the snap ring on the shock to the second groove for the rear shocks. It is already there and since I am using QA springs, I need to move it back to the first groove. These QA's are much better quality than the stock ones. Anyone need a set of stocks?
Motor was picked up at the shipper on Friday and it is now in the garage. Looks fantastic, cannot wait to dress it up and post some eye candy pictures. Hope to have most of the front end done tomorrow, sans the radiator mounts, they are still getting powder coated. If I get rear parts painted and reassembled, I may be able to have it mounted tomorrow as well.
I may have a rolling chassis by the end of next weekend. Oh, and some advice for those building a show car. Do not have FFR powder coat your frame. Their welds are not nearly as bad as some have said, but there is quite a bit of splatter. For a show car, I would want them cleaned up a bit. For me, won't matter, just some food for thought.


April 8, 2013
Progress moving a little slower than I would like. Control arms are together but am holding off on assembling the front end as my stepson wants to help and he has been away with his Dad the last two weekends I have been home. I did get the rear put together and in. Had to modify the lower mounts to clear the QA1 springs, as well as smooth out a weld on the shock eye and flattening the top of the eye to get it to fit right in the upper frame. Also had to use both spacers on top to the front of the shock to get it fit right.
Tomorrow will be the pedal assembly and starting on the firewall. Had an issue with two of the nylon lock nuts threading onto the bolts badly and eating them up. One bolt had to be replaced and both nuts.

April 13, 2013
Pedal assembly fit and mounted. Brake valves on. Got the firewall fitted tonight and traced out. Had to trim it a little around the bar welds to get it to fit right. It was either that or cut into the powder coat and trim the welds. Tomorrow, drilling and tapping! The firewall had an edge that was very rough and had to be smoothed as well. My bench belt sander and a 2" angle air sander with a sanding pad took care of it (and a little skin off of a knuckle)
April 15 2013
No drilling and tapping yet, yard work called my name instead and a small clean of the garage took place. Then Uncle Sugar took my spare play money today, so no new toys for a while. I am somewhat unmotivated by today's events in Boston, and missing my daughter and grandson and the wife is sick tonight. Going to crack the whip tomorrow and get the eye candy (motor) ready for pics. That should get me a kick in ass I need. Son told me last night he is even reading my blog...I was flattered. Sure wish I could share the build with him, but his business degree is in process and is far more important than a car. Maybe by the time he graduates we will be onto another build, the AC replica I would think, and I can share it with him. It's funny, my Dad has been dead for 14 years (at 55) from colon cancer, and hardly a day goes by in the garage when I don't think of him. It might be a tool I inherited...or do it the right way hits me when I think of a shortcut...or anticipating a tool even before I need it. He would love this build! And I seriously hope he is!
Need to get my calipers and mounts painted black too. Lots to do tomorrow!
April 30, 2013
Work has kept me away from the garage but I have had a little time to play with the motor. Got it mostly assembled for pics, but am having trouble getting the scoop butterflies to work in tandem with the carb. Ordered a new rod from Summit, hopefully it will work better than what I have been trying. Of course, once it get in the car and wired to the throttle and tranny, it is more than likely to change. Wife is itching to ride the bike, so will have to get her (bike) out of storage tomorrow and keep her (wife) happy.
May 10, 2013
Got the scoop figured out. Bought a much too long aluminum rod with heims on either end. Cut one end off, drilled and tapped that end, and presto, much shorter nice rod. Anyone have a clue how hard it is to drill into a 3/8 aluminum rod and find the dead center? Then it's a matter of holding perfectly straight while drilling. I bored a 3/8 hole in a wooden 2/4" that was then clamped onto the drill press. Used a level to make sure it was perfectly vertical, and then drilled a pilot hole with a smaller bit, then the size I needed. Tapping it was smooth.
Then, in spite of my best laid plans, I cannot use my original design for the PCV. There is not enough room between the back of the carb and the HEI to put an -AN 10 90 deg. fitting with a tube adapter. So my next thought is to add a spacer, turn it around and run the lines from the front. Plan on finally getting some work cracked this weekend.
Did get the power steering ordered as well. Time to get this going...
May 23, 2013
Ended up going with a 1" spacer and mounting the tube fitting towards the front. Could not use a straight fitting nor a 90 degree...had to buy a 45 degree to clear the thermostat housing. Discovered one of the studs in the spacer kit was not threaded. Contacted Summit, and they made it right and sent me another set free of charge. I love their customer service!
Front end is complete sans torqueing the bolts. Ran into a glitch I am trying to get answered, both of my front calipers are labeled "L". Get this figured out, get them painted and mounted and suspension will be complete. Talked with Tim Whittaker today about the firewall, so am on to that now. Front spindles and hubs are on. The remaining caliper and mounts are painted black.
Also got in my TCI valve body for the tranny and the electric steering came in as well. Gonna mount the unit under the dash on one of Michael Eversons' panels.
May 28, 2013
Talked with Barrel on FFRCars.com, and he sent me the pics to adjust the dash and footboards. Got them adjusted, drilled and lined with 50 mil heat liner. This will keep the heat from transferring from the firewall to the frame. I will add additional foam insulation once installed. Will get them tapped and mounted tomorrow.
May 29, 2013
Well nothing good is ever easy. Got 2/3rds of the firewall drilled and tapped. After doing 2 by hand, I decided to try using a drill to run the tap. Easy does it, a little oil, and back and forth with it, worked fabulous. One drill for drilling, a second for the tap and a third for the driver bit. Lucky I had three! One of them is a 20 yr old Craftsman 12v driver drill. Best one I ever bought. Batteries don't last long anymore but works great. Did break one drill bit, and wore another down trying to drill the bit out. Still have no idea how to get it out, any ideas?
I can tell you this, if you don't have a 90 degree drill, you might consider getting one, I needed it!
May 30, 2013
90% of the firewall done, only the hard ones left. Took a break and got the CNC master cylinder reservoirs mounted and plumbed with braided stainless -4 AN lines. Secured the lines with a couple of line clamps to the top of the pedal box where the stock reservoirs would be. Getting grommets around the firewall openings were a chore, had to snip them a little on the bottom as they were a tad too big. But are nice and secure on the lines. Had an afterthought that would have been cool, bulkhead fittings! Dinged my firewall in a couple of placed that will need sanded, dang it. I did get the entire firewall sanded down prior to installation for a satin finish, looks great in my opinion.
Really liking my Koul Tools AN line fitting tool. Especially since I was putting ends on the car and away from the vice, it worked great.
I really need more room in my garage...is it wrong to start looking at new houses with garages just because of this project?


May 31, 2013
Got the firewall finished, and the steering rack in. Then some much needed garage cleaning, lots of metal shavings from the drilling and tapping. Next is bending the brake lines, not my favorite thing to do, but then is the motor install!June 2, 2013
Had a peculiar issue to today when I went to plumb the brakes. I had intended to use the stock lower brake lines that came with the rear. Bought a 51" line to link the left to the right, as the FFR 60" was way too long. The stock right line has a tee fitting built in, and the way I plumbed my lines were the same as what was shown in the instruction manual, so I used the FFR supplied tee off of the left line. That left me one I needed to plug on the right. Went to Autozone, Advance Auto, and Lowes, and no one had a plug that would fit. So I thought I would be inventive, and cut one fitting off of the FFR 60" line that I did not plan on using, and weld it closed. Plan worked until I went to install the plug, and it was rather loose. So I attempted to install the brake line, and it too was very loose. The right/passenger side line had METRIC fittings, while the left/driver had SAE. I had another set of lines, so I checked them as well and they are exactly the same, SAE and METRIC. Needless to say, I had two options, order the FFR rear line kit or source one from Summit or Jegs. I think the FFR was a tad cheaper but I went with Summit and bought the following:Longacre (LNG-45283) Brake fitting frame tab - (2) @ 2.90 ea.
Russell (RUS-657042) ENDURA 18" -3 AN line with 10MM BANJO fitting, (2) @ $27.95 ea.
Wilwood (WIL-220-6410) brake line adapter (-3 AN Male to 3/8-24 in. Inverted Flare) (2) @ 3 $12.15 ea.
Wilwood (WIL-300-6416) retaining clip - (2) @ $1.32 ea.
Also realized I had the wrong front brake pads....argh. Another part to order. Also, found the ignition switch panel that I want to use at Jegs:


June 10, 2013
Took a little vacation and went on a 4 day 1200 mile motorcycle ride with the wife. Put a TCI constant pressure valve body in the tranny. Got the steering column in, brake lines completed (except for the right front - waiting on the caliper from FFR), and the aluminum fuel line ran and secured to the frame. Before I mounted the column, since I plan on using the Iditit turn signal mounted dimmer switch, I ran a fish wire per exsccaracer at http://www.ffcars.com/forums/120-factory-five-33-hot-rod-forum-sponsored-e-t-wheels/257321-ididit-cruise-control-dimmer-wiring-tip.html. Also got the correct brake pads on order.
June 12, 2013
Decided to post a picture of the heart of the beast. She is a 383, 430 horse small block Chevrolet.
Motor has lots of good stuff, including:
- 4 bolt, late model roller block with one piece seal, line honed, bored .030 over with torque plate
- Procomp aluminum heads, 210cc runners, 64cc chambers, 2.02/1.60 stainless valves, dual roller springs
- Scat 9000 series nodular steel crank, fully balanced to 7000 RPM
- Extreme duty H-beam rods with ARP rod bolts
- Probe forged pistons
- Howard cam, In .488/ Ex .509, 100 deg lobe angle, with 288/297 duration
- Delphi anti-pump lifters
- ARP rockers studs with Comp Cams roller rockers, and timing chain
Had a fiasco with the crankcase evacuation. Just goes to show, why buying things in advance does not always work as planned. I found a cool vent on Jegs that I decided I wanted to use, so I bought it before I even had the motor. Intake did not have a provision for it, so had to use the carb base. Since I wanted to use all braided lines, had to get a tube adapter. There was not enough room between the carb and the HEI. So thought I would get a spacer with a fitting and put it to the front of the motor. Ran into the same issue with the thermostat cover.
So, long story short, measure the pipe thread on my tube adapter and it was 5/8 fine. So i bought a drill bit and tap to make the hole fit the thread. Worked like a charm, and between all of the fittings I have tried, the bit, tap, and large tap handle, I probably spent on the order of $200 on it. Not one of my more frugal journeys, but I do like the result.
Jun 15, 2013
Steering column was hitting the brake pedal. Research said I had to space it over about 1/2". A trip to Lowes and some washers later, no more hitting. Also picked up a sheet of 1/2" foil backed insulation for the firewall. Should get it cut and put in tomorrow.Finished the nightmare of putting in the steering shafts. The ones that attach to the power steering unit did not have enough clearance on the shaft to allow the bolts to be inserted. Used a Dremel to increase the clearance on the shafts. Then had to cut the steering shafts to fit. Had to take about an inch off the middle shaft and the end shaft was only 2" long. Will get some pictures posted tomorrow. Took the better part of 3 hrs, including a trip to the hardware store for a replacement bolt, and another to Rural King for some blades for my reciprocating saw to cut the shafts.
Jun 17, 2013
Got most of the firewall insulated, fuse box mounted, and the Michael Everson inner dash panel. Trying to figure out how to attach my electronics, so decided on rivnuts. Got them on order from McMaster-Carr. Am mounting the Unisteer Power Steering controller, the Summit ignition box, and the starter solenoid on it. The starter solenoid will also double as a power junction for all my other items. Yes, I am going to run a Ford solenoid with a Chevy starter. Will keep the heat from killing it.
Debating on putting the motor in before I try to wire anything. Son wants to help with the car when he comes up, so if I get it in beforehand, he will be here for the first start. It is so cool he wants to help with this.
June 20, 2013
Steering wheel came in today, really nice piece. The rim is a 2 piece, I may get it re-wrapped with leather after I get the seats. Got all the electronics mounted with the rivnuts. Took me a while to figure out the tool. Finished the firewall insulation. Got the wire fished through for the Ididit tilt dimmer switch, and got it installed.Jun 28, 2013
Got the battery box mounted, and all of the cables cut, mounted with ends and shrink wrap soldered on. Need to find a place to mount the ground.
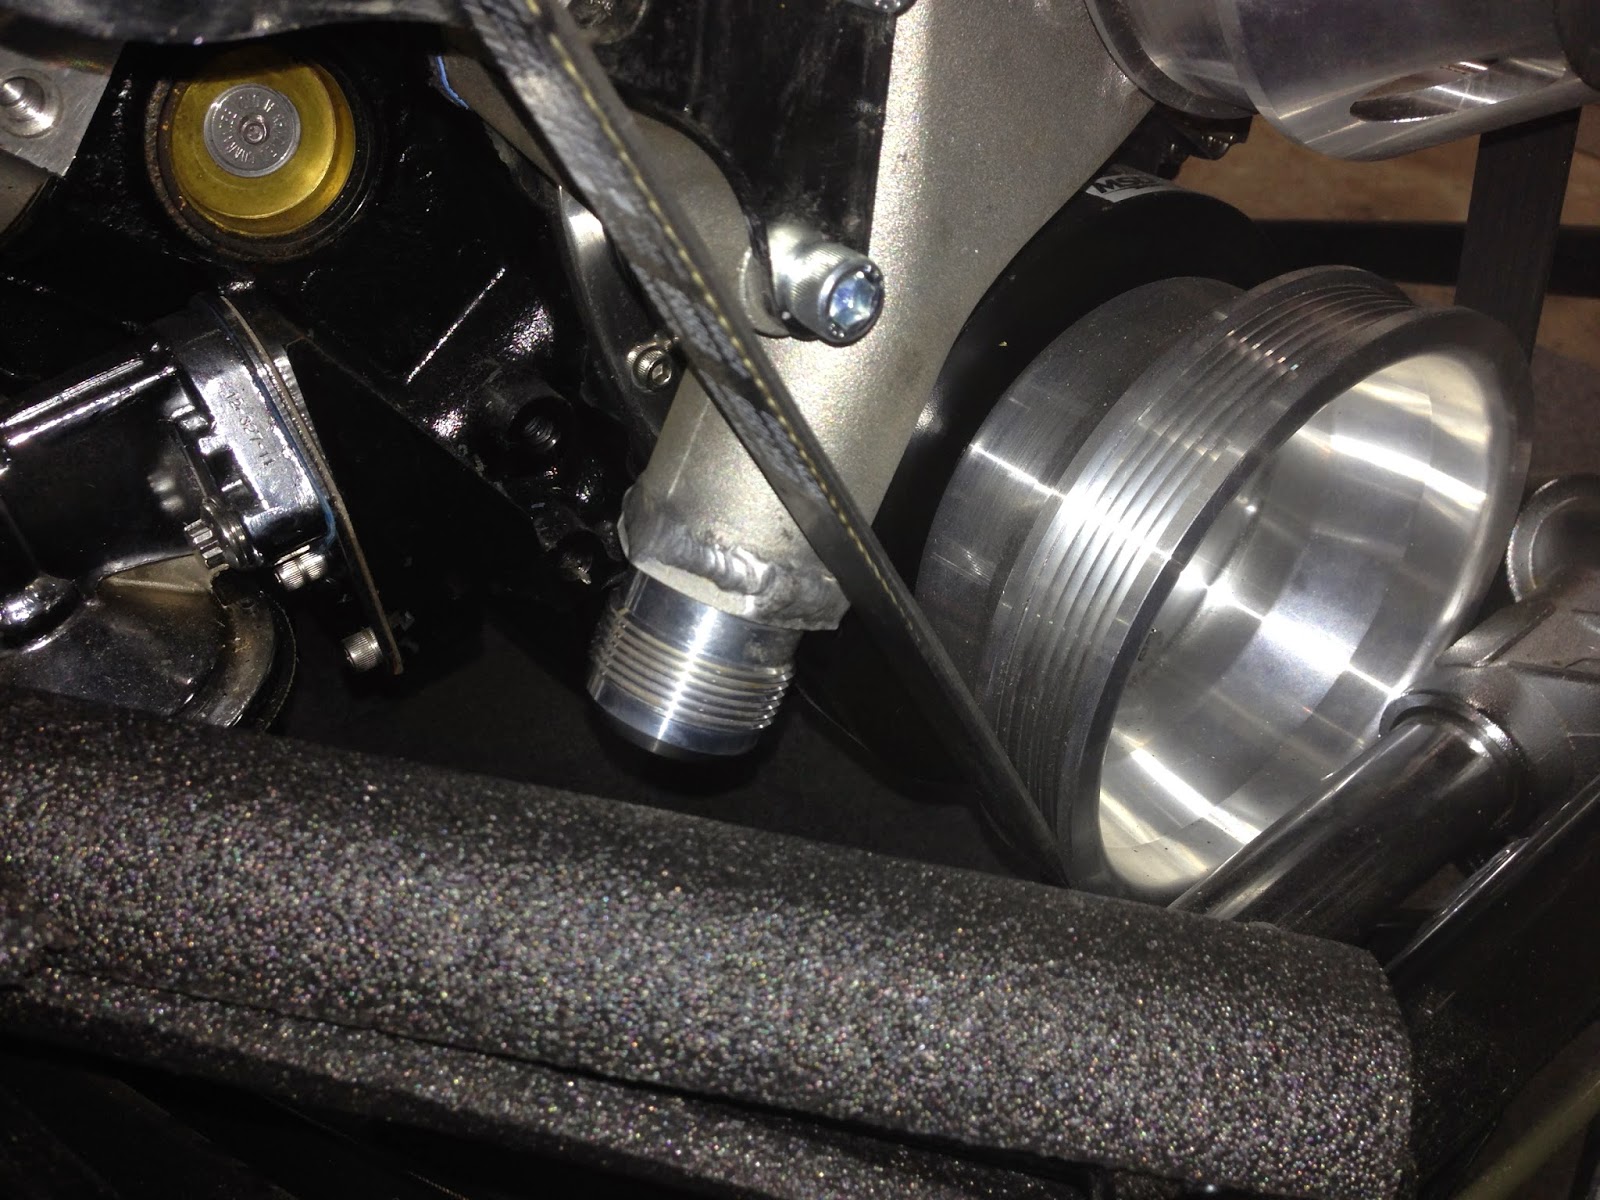
Motor is in, took a little while and had to fiddle with the motor mounts some, but got it in with the help of my lovely wife. One bit of bad news, cannot use my Gilmer belt drive, not enough room for the lower pulley. So had to order a short water pump, new pulleys and alternator mount. Someone on Craigslist is going to save a few bucks.


Got the carb, spacer, air cleaner and throttle cable mount installed. Next step is to drill the new holes for the power steering pump, had to reclock it about 30 degrees to clear the oil pan....basically drilling two new holes maybe 1/2" from the stock ones. Got most of the switches wired to each other for lights and ground. Then to mock a dash, and start the wiring, along with the fuel tank from Boyd's.
Also got Doc from the forums to help me figure out the wiring for the start button and ignition toggle. Did have to order a new 30 amp toggle as I am sure the Jeg's supplied on was not a 30 amp.
Spent a little time with her tonight. Got the new water pump on and all the old off. Alternator mount and pulleys should be here tomorrow. Tightened up motor mounts, mounted starter and right header, and secured the intake/air cleaner scoop. Made a jumper wire for the starter since I am using the Ford solenoid. Here is a diagram:

Grrrr...not having any joy with my choices of alternator mounts and belt drives. Did not like the alt mount with the short water pump. So I put the long pump back on and found a ribbed belt pulley set that cleared the steering rack. However, the pulleys are made for a reverse water pump so I had to tweak the mounting holes on the water pump pulley to make it fit. No biggie that a large bit on my drill press could not handle. Then the pulleys refused to line up with the alternator. If I tweak the alternator mount to make it fit, I will have to do some major grinding on it, and it will look like crap. So far, I am down 400+ bucks and still have no belt arrangement I like.
Jun 26, 2013
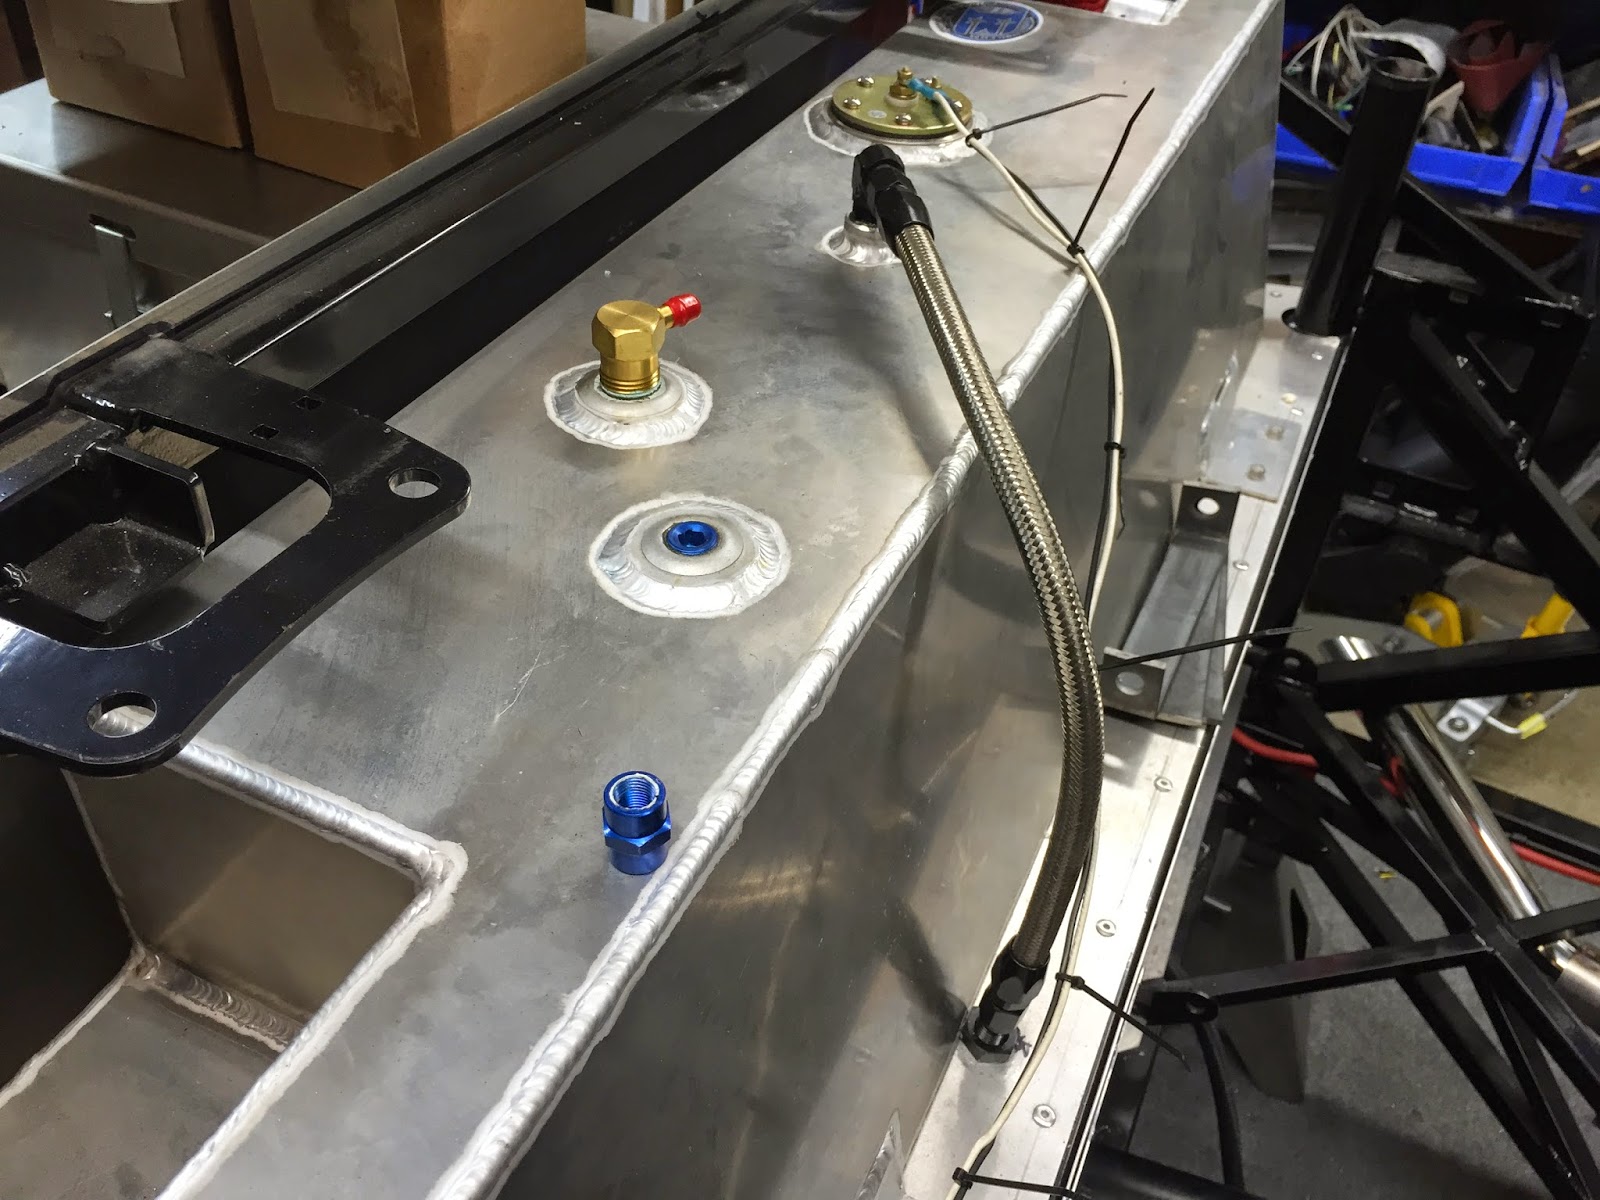
On my way back from a week in Pasadena, great town for California, but miss my rod. Got to get into the garage tomorrow and get some done. Got a tank mounting panel from Tim Whittaker, so going to get that in and the tank mounted. Then onto the finish the engine wiring and go for a first start soon.Aug 9, 2013
OK, did not get as much done as planned. Starter is mounted. It is amazing how the smallest things that should be obvious, are not always and can get one hung up.I mounted the starter and it did not clear the flex-plate. It was going to take almost 1/4" of shims to do so. I thought that could not be right, and realized my starter was for a 153 tooth, not a 168. However, all the mini-starters are sold as fitting both. After reading and fiddling for a few hours, I realized there was another set of mounting holes on the starter to the block. What do you know, they worked with no shims. Did have to reclock the solenoid to clear the header, but that was easy.
Have a ribbed alternator arrangement on it now, on first start will see if it is tracking true. If not, have a v-belt setup in reserve. The alternator is VERY close to the valve cover, but looks like I may get lucky.


Tim's under tank plate is mounted with 3/16" rivets and the Boyd's tank is mounted and plumbed. Used self tapping 1/2 screws for that. Started the nightmare of a wiring harness, mounted all my gauges and switches to a board to help route the wires, and let me check functionality when we are ready to start. Battery cutoff and Ford starter solenoid are wired. All the gauges are started with molex connectors for easy removal if needed.
Have decided since I am using a switch and push button starter, and manual fuel pump, I need some sort of "theft deterrent" device aside from my .45. I am wiring the clutch safety switch into a push button on the shifter. Without pressing that while hitting the starter button will not allow it to start. I thought that was pretty clever.
Now have to wire the power steering, the high beam switch, the ignition box and everything else I can without my stage 2. Going to place that order probably next month.
Dec 2, 2013
OK, project was delayed by work and laziness, but is back on track.Got some more parts in and got the battery mounted and wired. Using a nice aluminum box mounted up in the trunk. Prob should have mounted it lower, but oh well....am not building a road racer.
Got power steering wired along with most of the engine. Working now on the starter button and switches.
Dec 12, 2013
Decided to replace the factory shocks with QA1. Got them all installed, but had to get 8" springs for the front, but are all in. Really nice pieces.

Ran into a wiring issue. Harness has double connections for hooking to the column. Jason at FFR informed me that I was not to use the lose ones just use the connector labeled Hot Rod for the column harness. Got that done, but still chicken to start the gauges.
Did get the horns mounted, along with the wire loom to most of the front end replaced.

Jan 12, 2014
Got the distributor in and set on compression on No 1 cylinder. Ended up with a new spark plug wire loom arrangement as the previous one hit my oil dipstick. Even with the new set, I have to space it up a couple of inches. Ordered some longer studs from Summit, they should work good.Got all the plugs in, used anti-seize on them. Amazing how long this little stuff takes to get done. Got the bump steer kit ordered from Tim Whitaker, should be a nice piece, will post pictures.
Jan 15, 2014
Studs were just a 1/2" too short. Cutting the spacers was ugly, so I found some nice aluminum ones at aluminumspacers.com. Should be in tomorrow.
Jan 6, 2014
Decided my little heaters were not enough and ordered infrared heaters for the garage. Wired them onto a switch and mounted them around the ceiling. Keeps the garage nice and warm even on the coldest days.Oct 2, 2014
Work dominated my time, and am just now getting back to working on the car. Onto the fuel lines, decided to go with both braided stainless lines and hard 3/8 aluminum line. Ran lines down the passenger side of the vehicle.


Used -6 for the fuel and transmission coolant lines and -10 for the PCV line.


Mad a semi-expensive mistake, but actually glad I did. Needed to pull one of the intake plugs for the radiator fan sender. Since I used an aluminum plug in an aluminum intake without anti-seize, it decided to gall and not come out. Tried drilling it out but ended up breaking a 1/2" bit in the intake. Oh well, I really wanted an Edelbrock Air Gap dual plane anyway. Bought and installed.
Used -8 AN stainless lines for manifold coolant lines that run to a plate on the bottom of the thermostat cover and rear of the intake manifold. This will help eliminate hot sports in the heads under race use.

Nov 1, 2014
Changed over to Tim W.'s bump steer kit.
Nov 3, 2014
Got the intake connected to the carb. Had some issues with the butterflies wanting to flip over on WOT. Uses a low tech method and inserted a bolt to keep it from going to far.


With the coolant lines in place, I do not have room to move the vacuum advance canister on the distributor more than about an inch. So I swapped the unit out for a mechanical distributor.
Nov 27, 2014
Found some nice Made For You T-Clamp polymer fittings at Summit, and reasonably priced, to mount the tranny coolant lines. 4 pack was around $20 bucks. There were many aluminum ones, but at $13-20 each, they were a little steep. Drilled and tapped the mounting holes, removed the set screw from the back of the clamps and used the included bolt to mount then to the frame and firewall. Ran the lines along the bottom of the firewall and down the bottom of the frame. They look good.


Need to buy another set, don't like the current spacing, think the lines need more support.
Dec 5, 2014
Ordered my Stage II kit!!!!! Jan 17th is the tentative ready date. From FFR I had them mail me my grill and exhaust ahead of time so I can start the car.
Also ordered from Summit:
- Seats - Scat Pro buckets
- Mufflers - Magna Flow 13325s
- -16 and -20 AN hose and fittings for radiator hoses
- -4 AN and clamps for radiator overflow
- Tach and speedometer
- Seam sealer and aluminum tape for gaps in the aluminum
Got the rear cockpit aluminum drilled, beaded with silicone, and riveted in. Installed Mike E's shroud and the electric fan on the radiator. Now trying to decide on a gas filler door to mount on the body. Give me your vote:
1.
2.
3.
4.
5. 
I am leaning toward 3.
Dec 10. 2014
Sitting in a hotel room in Evansville IN, all my presents are arriving at the house and I am not there to unwrap them. For some reason my wife will not open and unwrap them all and pose with them for me. Heck, I would have even taken just pics of the parts.
All my Summit orders came in (mufflers, seats, hoses, gauges, and fittings), a few tools from Sears (19.2v Reciprocating saw and angle grinder, retractable drop light), and a new hole saw kit from AutoZone, and my Grill and Exhaust kit from FFR.
I have a hodge podge of hole saws that most are not bi-metal....I ate one trying to cut some sheet metal to use as a temp gauge and ignition switch mount. Ground that sucker down quick.
Ordered some of the 2K Urethane paint from Eastwood in Satin Black so I can paint the grill shell, not the fins. Still waiting on the -16 and -20 AN fittings from eBay (China). The -20s were less than a third of the price at Summit. If they hold up, they were worth it. If not, an easily fixed mistake.
Dec 18. 2014
Had to redo one of the upper radiator hoses. The straight ends were too severe so bought a 45 deg and it worked great. Got the radiator mounted on the grill, but had some issues with the rivnuts. Ordered some for thicker material from McMaster-Carr, hope to have them installed tomorrow. Also got the paint for the grill in and will get it primed and painted tomorrow.
Tried to find 18 ga. aluminum for the muffler heat shields. Ended up buying a couple of 1/2 size aluminum cookie sheets off eBay. Have to shave the edges off but they are the perfect size. Got the drivers side exhaust mocked, should get it mounted tomorrow as well.
Dec 25, 2014
Merry Christmas everyone. My gift today was getting to work on the hot rod with my son. Grill painted and installed, radiator and tranny coolant lines ran. Still working on getting the overflow mounted, had to order a couple of things from McMaster-Carr to make it work mounting it to the fan shroud.
My cookie sheet aluminum did not work as planned so I ordered a couple of pre-cut pieces from onlinemetals.com. They are perfect. Ran into an issue mounting the exhaust, seems the FFR clamps have the tube welded to the wrong end. Will have to call them tomorrow.
Driveshaft is mounted...that was fun trying to get the rear axle to rotate with no weight on the rear. My son sitting on the chassis helped. Kept all the control arm connections loose until I can get it on the ground with some weight to avoid a preload on the fittings.
Tomorrow hitting the wiring hard. Maybe go for a first start try.
Jan 1, 2015
Woo hoo....got the start and ignition wired up, would not crank. Remembered did not wire the neutral safety wires together. As soon as we did that it cranked immediately. Wired in the oil pressure gauge and cranked until we showed pressure. Added some fuel and had a few leaks to contend with, but had 8 PSI. Added the ignition circuit and with a few tweaks of the distributor, she was running. First is the initial start and the second was a little more revs.
Jan 19, 2105
Picked up the body from FFR on Saturday. Got a tour of the facility, really nice place...the ultimate playground for a car guy. Cut off the body lowers and she fit nicely in the bed of my Ram. Long trip from Dayton OH to Wareham MA, but we did it in 2 days and now she is home. A few pieces are on backorder, like the seat harness and windshield.


Tomorrow getting the exhaust and floor wrapped up, then onto the trans tunnel and shifter mounting. Also have to fit and mount the tranny dipstick and kickdown cables.
Got a new driveshaft while at FFR, so I need to get the 700r's yoke fitted to the shaft.
Lots to do!
Feb 8, 2015
Got the new headlights wired. Went with a set off of Speedway.com, with glass bulbs and black buckets. Needed to come up with a spacer to stand them off a little, so ordered some 1"ers from aluminumspacers.com.
Mar 6, 2015
Since I added one of Mike Everson's fan shrouds, I had to come up with an alternate mount for the overflow. Mounted it to the shroud using rivnuts. Used a button head screw and an insulated clamp to route the hose. Also converted it over to an AB -4 on the top.


Jan 12, 2017
Well, after a hiatus, I am back underway. Bought a new house, with a three car garage, and tore a disc in my back and could not bend over or lift anything for almost a year, time to get back to it.
In the process of getting the floor drilled and mounted. The seats I chose are requiring me to reshape the driveshaft tunnel. All this weekend!